In the previous article we learned how to prepare a website management panel with EasyAdmin and Symfony. The next stage of building our web application is adding authentication and authorisation. Our goal is to stop unauthorised users from accessing the resources of the admin panel.
Authentication vs authorisation
First, it is worth explaining the difference between authentication and authorisation. These terms are very often used interchangeably, which unfortunately causes plenty of problems and misunderstandings. (In Polish, an incorrect calque of the English word “authentication” adds to the confusion.)
Getting to the point, authentication is the process of verifying the user, more precisely checking whether a person is who they claim to be. In IT systems this is most often done with a form where the user has to enter a login and a password.
Authorisation is something different, and it does not have to be used together with authentication at all. It is responsible for checking whether a given user should have access to specific resources.
For the website we are developing in this article, combining authentication and authorisation seems natural. Access to the website management panel should be restricted to a specific group of users, so that no unauthorised person can make changes to our system.
Assumptions of the security system for our website
Our goal is to secure the admin panel of the web application. We should make sure that no unauthorised person can get into the area reserved for designated people.
We already have user management in our system, so it would be best to use our repository, the database, to store credentials. We should also extend the User entity with a field for so-called roles. We will use it to build an authorisation system that can be expanded considerably. To start with, however, we will create only two roles: ROLE_USER and ROLE_ADMIN.
An out-of-the-box solution
First, I have good news for you. Symfony has built-in mechanisms that will help us secure our web application. We need to make sure SecurityBundle is on board. Flex comes to the rescue and takes care of installing this bundle correctly.
composer require symfony/security-bundle
If everything went well, a configuration file config/packages/security.yaml should appear in our system. It is the heart of the security system for our website. Do not worry about its contents; I know it can be overwhelming at first glance. In a moment I will explain what each section of the configuration is for. Then we will go step by step through the process of securing access to the website’s admin panel.
Security.yaml
The configuration of our security system consists of 3 main parts. Before we go further, we need to explain which section is responsible for what.
Providers
The part responsible for users: how they are stored in the system and how access to the repositories storing user data is handled.
Firewalls
The section where we divide our website into parts. Every request sent to the application has to pass through a firewall, which it is matched to, for example, by the requested URL.
In a firewall we define whether authentication is required, the login form and the user provider.
Access control
This defines access rights to selected parts of the system.
Now that the structure of the configuration file is clear, we should turn to the User entity file, which was created with MakerBundle in the previous article. Note that the class implements two interfaces that make it compatible with the Symfony authentication and authorisation system.
<?php

namespace App\Entity;

use App\Repository\UserRepository;
use Doctrine\ORM\Mapping as ORM;
use Symfony\Component\Security\Core\User\PasswordAuthenticatedUserInterface;
use Symfony\Component\Security\Core\User\UserInterface;

#[ORM\Entity(repositoryClass: UserRepository::class)]
class User implements UserInterface, PasswordAuthenticatedUserInterface
{
    #[ORM\Id]
    #[ORM\GeneratedValue]
    #[ORM\Column]
    private ?int $id = null;

    #[ORM\Column(length: 180, unique: true)]
    private ?string $email = null;

    #[ORM\Column]
    private array $roles = [];

    /**
     * @var string The hashed password
     */
    #[ORM\Column]
    private ?string $password = null;
Once we have made sure that the class exists and has all the required properties and methods, we can move on to modifying the security.yaml configuration file.
First we need the right user provider, so in the providers section we add app_user_provider. It will feed user data to our web application, so we specify the path to the User class and the email property, which will act as the identifier.
# config/packages/security.yaml
security:
    # ...

    providers:
        app_user_provider:
            entity:
                class: App\Entity\User
                property: email
Since we will store user data in a local database, we need to think about how to store user passwords. Here too Symfony comes to the rescue with ready-made mechanisms. To use them, we add a new “password_hashers” section to security.yaml, where we specify the class responsible for password hashing. The default password hashing algorithm used by the latest version of Symfony is bcrypt. However, nothing prevents you from using another method: just define your own class implementing the Symfony\Component\PasswordHasher\PasswordHasherInterface interface. This sometimes comes in handy when migrating data from one system to another.
# config/packages/security.yaml
security:
    # ...
    password_hashers:
        Symfony\Component\Security\Core\User\PasswordAuthenticatedUserInterface: 'auto'
It is very important to realise that the passwords we store in the database must be hashed. This means they have to be processed properly before being saved. For example, if our form for adding users in the admin panel accepts a password, we must hash it before saving. The same applies to using fixtures. Also remember that if we create a registration form in our system, we must also provide an implementation that hashes the password. If the database already contains user passwords stored as plain text, we can use a console command that hashes existing passwords.
php bin/console security:hash-password
Now let’s move on to our website’s firewall. The default security.yaml file already has an entry in this section.
security:
    # ...
    firewalls:
        dev:
            pattern: ^/(_(profiler|wdt)|css|images|js)/
            security: false
        main:
            lazy: true
            provider: app_user_provider
The first firewall defined is “dev”, restricted to a specific pattern. As you can see, the point is to remove security from all requests coming from the profiler or for static files.
What interests us most is the firewall called “main”. We need to tell it which user provider to use; in our case, the app_user_provider defined earlier. We also set the lazy property, which ensures that the web application loads the user object only when it is actually needed.
The login form
We have reached the point where we need a place where users can authenticate before accessing our website’s management panel. So let’s start by generating the controller responsible for the authentication process, including displaying the login form.
Using the maker, we generate the Login controller.
php bin/console make:controller Login
As a result, a new file appears in the src/Controller directory.
<?php

namespace App\Controller;

use Symfony\Bundle\FrameworkBundle\Controller\AbstractController;
use Symfony\Component\HttpFoundation\Response;
use Symfony\Component\Routing\Annotation\Route;

class LoginController extends AbstractController
{
    #[Route('/login', name: 'app_login')]
    public function index(): Response
    {
        return $this->render('login/index.html.twig', [
            'controller_name' => 'LoginController',
        ]);
    }
}
At this point it is an ordinary controller that does nothing special yet. What interests us is the action name “app_login”, which we should keep and then use in security.yaml.
# config/packages/security.yaml
security:
    # ...
    firewalls:
        main:
            # ...
            form_login:
                login_path: app_login
                check_path: app_login
As you can see, we added form-related entries to the “main” firewall, setting login_path and check_path. These are the routing paths for displaying the login form and for verifying the user’s password, respectively. In our case, one controller action will handle both.
Let’s go back to our controller for a moment. We need to adapt it so that it can perform its authentication role. We will inject the $authenticationUtil service into the index method. We will also pass information about any form errors and the last username used to the HTML template.
<?php

namespace App\Controller;

use Symfony\Bundle\FrameworkBundle\Controller\AbstractController;
use Symfony\Component\HttpFoundation\Response;
use Symfony\Component\Routing\Annotation\Route;
use Symfony\Component\Security\Http\Authentication\AuthenticationUtils;

class LoginController extends AbstractController
{
    #[Route('/login', name: 'app_login')]
    public function index(AuthenticationUtils $authenticationUtils): Response
    {

        $error = $authenticationUtils->getLastAuthenticationError();
        $lastUsername = $authenticationUtils->getLastUsername();

        return $this->render('login/index.html.twig', [
            'last_username' => $lastUsername,
            'error'         => $error,
        ]);
    }
}
Now let’s prepare the Twig file for our HTML template.
{% extends 'base.html.twig' %}


{% block body %}
    {% if error %}
        <div>{{ error.messageKey|trans(error.messageData, 'security') }}</div>
    {% endif %}

    <form action="{{ path('app_login') }}" method="post">
        <label for="username">Email:</label>
        <input type="text" id="username" name="_username" value="{{ last_username }}">

        <label for="password">Password:</label>
        <input type="password" id="password" name="_password">
        <input type="hidden" name="_target_path" value="/account"> #}
        <button type="submit">log in</button>
    </form>
{% endblock %}
To complete the picture, we also need to handle logging out of the web application properly. To do this, we need to create the right controller action. We will use the LoginController created earlier, adding the following code.
#[Route('/logout', name: 'app_logout', methods: ['GET'])]
    public function logout()
    {
        throw new \Exception('Don\'t forget to activate logout in security.yaml');
    }
The last step is to complete the firewall configuration by specifying the path to the action responsible for logging out.
form_login:
    login_path: app_login
    check_path: app_login
logout:
    path: app_logout
Finally, we deal with a very important element: access control, the authorisation table where we configure resources and the user groups that should have access to them. For our website we will create just one entry. It will restrict access to all resources whose paths start with “admin”. This way the application’s management panel will be available only to the website’s administrators.
access_control:
    - { path: ^/admin, roles: ROLE_ADMIN }
Summary
We have just finished the development work, or rather the configuration work, since most of the code was generated automatically. Now just type the address of the admin panel of our application into the browser’s address bar. A form should appear, which it would be a good idea to restyle to make it more attractive. That does not change the fact that functionally we are ready to authenticate. After entering a correct login and password, we should be redirected to the panel.
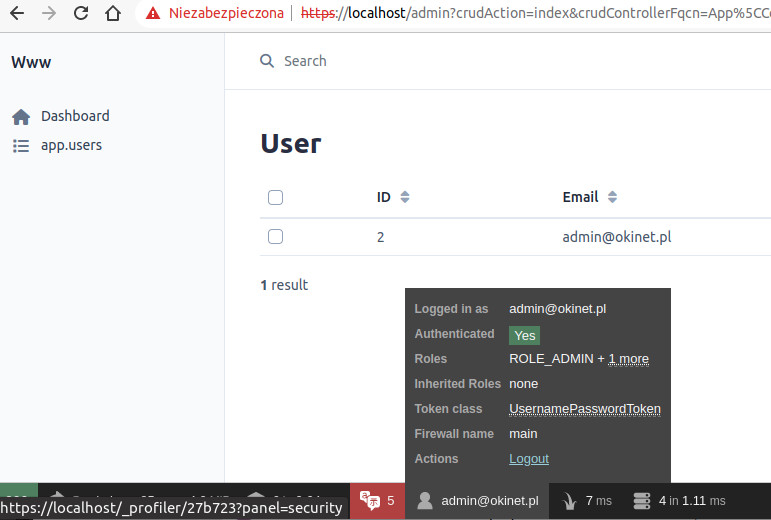
Thanks to the profiler, we can easily check who we are to the application. As you can see in the screenshot above, we are authenticated as a user with the ROLE_ADMIN role in the main firewall.
The example presented in this article is one of the simplest possible uses. In real web applications, the authentication and authorisation system would probably be more complicated. In our case, however, we were able to secure the website very easily, which shows what a tool the Symfony framework is.