Wouldn’t it be wonderful if every change made in the repository automatically appeared in the production environment? Web developers have been struggling with this for many years.
There are many platforms, services and solutions on the market that can meet this need to varying degrees. Automation is a very complex topic and can take different forms and scopes. It all depends on how we deliver our web application to end customers. With an extensive system made up of different runtime environments (dev, test, prod and so on), the automation process will look completely different than for a simple WordPress-based website.
Imagine a system that is constantly being developed, where changes should be delivered smoothly to the right environment. On top of that, before deploying changes from the repository, we should run tests every time. We could add one more element: the need to build a Docker image from the sources in the git repository. Replacing the image that serves as the base for containers running, for example, in Kubernetes would be the last piece of the puzzle.
As you can see, this process can be very complicated, and it would be easy to forget something or do something wrong while performing these operations manually one after another. That is exactly why such complex operations are automated. This shortens the time it takes to deliver changes and reduces errors and faults.
In this article we will not build a configuration for a process as complex as the one described above. We will focus on the basics that let us take care of automation on a smaller scale.
The web application we will build the environment for
First we need to set a goal, so we should think about what we want to automate and how. Our example will be a WordPress-based website. The starting point is the version control system, git. We cannot start without it, because practically all modern software development models are based on git or another version control system.
In this article we will build the configuration with Bitbucket Pipelines. However, similar solutions exist at competing providers (GitHub Actions, GitLab and so on).
The website we are building and developing runs on a server in the classic LAMP model. We will publish updates with git by pulling the latest changes. So that our example is not too simple, I suggest we work with two branches: master and dev. We will have two runtime environments. The first will be the development version of the website, where new features are developed and changes are made. The second environment will act as production. The mapping between git branches and environments will therefore look like this:
- master -> production
- dev -> development
The beginning: git hooks
Before we focus on the solutions Bitbucket provides, let’s stop for a moment and think about how all this is possible. Git has a wonderful feature called git hooks.
It is simply a mechanism that lets you plug your own code into specific events in the repository (before a commit, after a commit and so on). Many years ago, the first automation mechanisms were built on this. Today is no different: popular source code versioning platforms are also based on it. Of course, it is now wrapped in advanced mechanisms at various levels, but the trigger for further actions is still a git hook.
Bitbucket Pipelines
Let’s assume we have a repository hosted on Bitbucket. If we do not have a dev branch yet, we should create one (git checkout -b dev). Now it is time to explain what these magical pipelines are. They are simply a sequence of instructions formatted in a YAML file and executed in specific situations. You should know that everything executed in a pipeline runs inside a container built from a specified Docker image. Bitbucket Pipelines is integrated with Docker Hub, so we can use our own images.
To think about automation, we need to configure a few things in our repository settings. First we have to enable pipelines in our repository. This option is disabled by default.

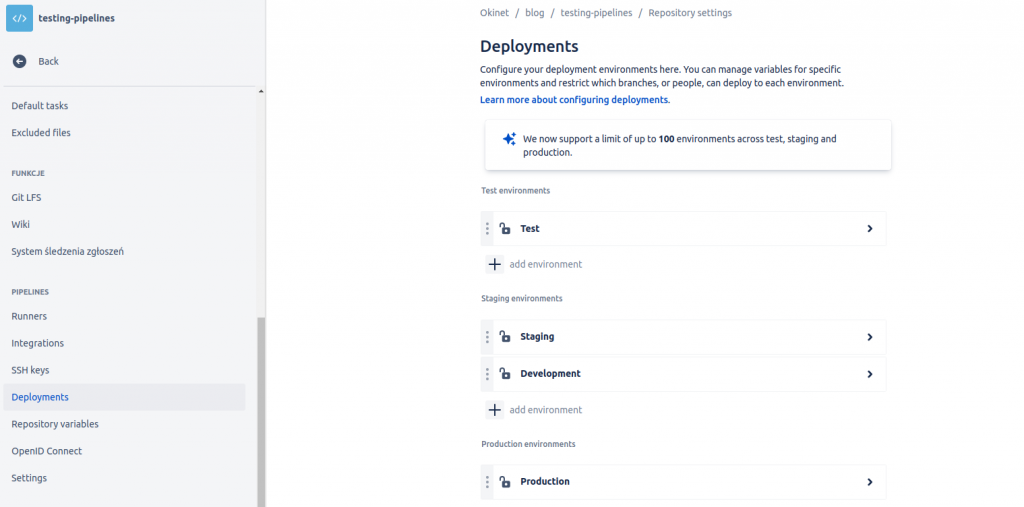
The next step is to set up the runtime environments. In the repository settings, go to the pipelines -> deployments tab. There you will see a screen with the default environments (test, stage, prod). In our simplified model we will use only two: dev and prod. As you can see, we need to add the dev environment. To keep things tidy, let’s add a new item to the staging section.
The bitbucket-pipelines.yml configuration file
The heart of the mechanism is a special file that has to be stored in the repository. Once the file is added, our instructions will be executed by Bitbucket. Before we do that, though, let’s look at the syntax and the basic building blocks.
Image
The top-level element that will always be with us is “image”. This is where we specify the name of the Docker image that becomes the basis for creating the container. Our instructions run inside this container. We can prepare our own images with software already installed and configured, or use a general-purpose image such as Ubuntu.
Definitions
This element is not always used, because in small projects instructions are not grouped into definitions. Definitions are divided into steps, which in turn contain specific commands to run. Using this clause helps you keep things readable and means some steps do not have to be repeated.
Pipelines
Under this keyword we configure the actions to be performed. It comes down to setting the order of consecutive steps, which may have been described earlier in the definitions section. Operations can be run separately for each branch of the git repository.
Clone
Before each step, Bitbucket performs a git clone, that is, it fetches a fresh copy of the git repository for the procedure being run. This makes sense, because tests are most often run on the code in the repo. However, we do not always need it, and sometimes it can even get in the way. An example is a deploy that tries to launch a new version of the application based on processes from previous steps. That is why the clone clause lets us control this behaviour at the pipeline configuration level.
An example configuration that deploys a website
Below is an example of a complete bitbucket-pipelines.yml file. When we add it to the root directory of the repository with the “pipelines” option enabled in the configuration, Bitbucket will start the deployment process with every commit.